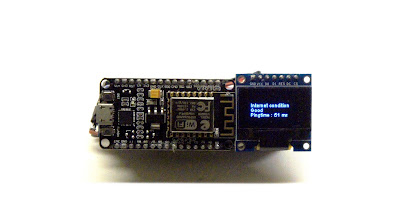
Internet speed test with NodeMCU
In world of IOT, it is mandatory to have good internet
connection(all the time). Due to limited understanding of the internet technology. we end-up increasing bandwidth of the internet to every internet speed related problems. Did this solve your issues? I
think, No. Because internet speed does not always dictate by bandwidth.
There are two terminologies used for good quality of internet,
one is Bandwidth and other is latency. Most of the peoples are aware of
the bandwidth, but not latency. As per my understanding you need less latency(less)
with good bandwidth(higher) for quality experience. This you can
compare with your water pipe diameter and length. A diameter of the water
pipe is your bandwidth and length of the water pipe is your latency. So, no
matter How big is your bandwidth(diameter) but if length(latency) is higher you
may face glitches in your connection. It may be specific to site also.
Wiki definition of the bandwidth is, the amount of data that
can be transferred from one point to other in seconds. which measured in "MB/second",
but latency is the time that a data packet takes to travel from one point to
another which measured in "delay".
Hope we have better understanding now, A bandwidth you can
check online and latency you can measure with help of ping command in you
command line.
In above screenshot, I pinged google four time and measured
mean time in milliseconds. In bottom-line it shows mean values of all four
pings.
It is time consuming process to measure latency with help of
computer and command line, Here I have quick tutorial of making stand alone latency measuring
device with help of ESP8266 with SSD1306 display. It pings google at every
minute(10 time and then provides mean value) and capture response time in milliseconds.
Basic feature,
1) Standalone latency measuring device.
2) Onboard SSD1306 SPI display for results.
3) Internet ping time capture at every 1 second (changeable).
Basics you need to
know,
1) NodeMCU with Arduino IDE
2) SSD1306 SPI display with its library and connection.
3) 16850 battery (Optional) Or you can connect micro USB to NodeMCU.
3) 16850 battery (Optional) Or you can connect micro USB to NodeMCU.
Future scope,
Integration of reading with Google drive for everyday
check with power-sleep mode.
To Start with SSD1306
SPI display.
It comes in different options please make sure you have display
with SPI connection or have compatible driver in Arduino. Im using a display
with SPI connection.
Arduino library:
1)
Display connection to ESP8266 library from squix78
2)
Ping machine library from dancol90
https://github.com/dancol90/ESP8266Ping
Hardware connection:
Display connection with NodeMCU (ESP8266)
Please note all the data pins are mentioned as per NodeMCU
hardware, If you want to make direct connection with ESP8266 check corresponding
pin numbers.
Code:
Do not forget to change SSID, Password section.
#include <ESP8266WiFi.h>
#include <ESP8266Ping.h>
#include <SPI.h> // Only needed for Arduino 1.6.5 and earlier
#include "SSD1306Spi.h"
const char* ssid = "SSID";
const char* password = "Password";
const char* remote_host = "www.google.com";
// Initialize the OLED display using SPI
// D5 -> CLK
// D7 -> MOSI (DOUT)
// D0 -> RES
// D2 -> DC
// D8 -> CS
SSD1306Spi display(D0, D2, D8);
String avg_time_ms;
int i;
void setup() {
Serial.begin(115200);
delay(10);
// Initialising the UI will init the display too.
display.init();
display.flipScreenVertically();
display.setFont(ArialMT_Plain_10);
Serial.println();
Serial.println("Connecting to WiFi");
WiFi.begin(ssid, password);
while (WiFi.status() != WL_CONNECTED) {
delay(100);
Serial.print(".");
}
Serial.println();
Serial.print("WiFi connected with ip "); // Just for troubleshot purpose.
Serial.println(WiFi.localIP());
Serial.print("Pinging host "); // Just for troubleshot purpose.
Serial.println(remote_host);
}
void loop() {
if(Ping.ping(remote_host))
{
Ping.ping(remote_host, 10); //10 time ping to google, You can change value to higher or lower
i= Ping.averageTime();
avg_time_ms = Ping.averageTime(); // reading string and Int for easy display integration.
Serial.println(i);
if (i < 99) // It is in general term, Please change as per your requirement
{
display.drawString(14, 40, "Pingtime :");
display.drawString(64, 40, avg_time_ms + " ms");
display.drawString(14, 20, "Internet condition");
display.drawString(14, 30, "Good");
}
if (i > 100 && i < 199) // It is in general term, Please change as per your requirement
{
display.drawString(14, 40, "Pingtime :");
display.drawString(64, 40, avg_time_ms + " ms");
display.drawString(14, 20, "Internet condition");
display.drawString(14, 30, "Bad");
}
}
else
{
Serial.println("Error :(");
display.drawString(14, 20, "Internet condition");
display.drawString(14, 30, "Offline");
}
display.display();
delay(60000); // Every minutes
display.clear();
}


Good Post. I like your blog. Thanks for Sharing
ReplyDeleteWiFi Speed Test
thank you. you can also follow blog to avoid missing any updates
DeleteThank you, Please keep following for further updates.
ReplyDelete
ReplyDeletehello, you know your article is amazing and this article is helping for me and everyone and thanks for sharing information tq
Internet speed test
thank you for response, please keep following blog and share.
DeleteHi, Amazing your article Internet Speed Test. It's really good and helping dude. thanks!
ReplyDeleteThank you, Please share to other friends as well.
DeleteThank you John, Looking for more support. :)
ReplyDeletecan i have aia file of this project
ReplyDeleteSorry, Most of the details are there in the post. I dont have any other file with that format.
Delete